Main products on a menu are referred to as “Meals” within the Vita Mojo system.
BUILDING PRODUCTS
Main products on a menu are referred to as “Meals” within the Vita Mojo system. This article will guide you through the process of building your meal, including how to add customisations.
If you’re creating a meal from scratch, we recommend watching the product school video below and following the step-by-step guide.
Top Tip: If you already have a similar meal in Vita Mojo, use the “Copy Meal” functionality. This will save you time by allowing you to duplicate the existing meal and avoid re-entering all the information.
VITA MOJO PRODUCTS SCHOOL VIDEO
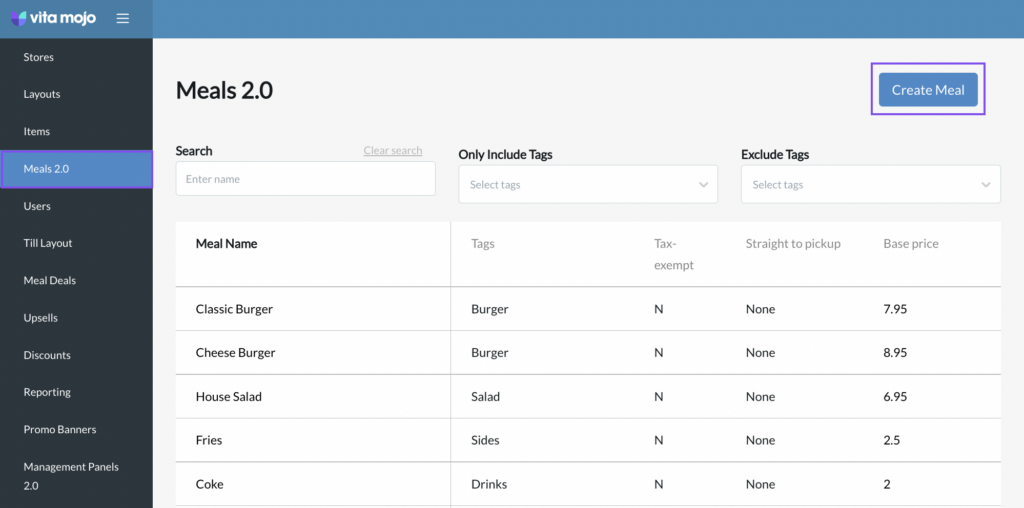
Accessing the Meals section
First, log into Management Panels 1.0 and navigate to Meals 2.0
Select Create Meal
Top Tip: If you already have a similar meal in Vita Mojo, select the existing meal from the meal list and use the “Copy Meal” functionality. This will save you time by allowing you to duplicate the existing meal and avoid re-entering all the information.
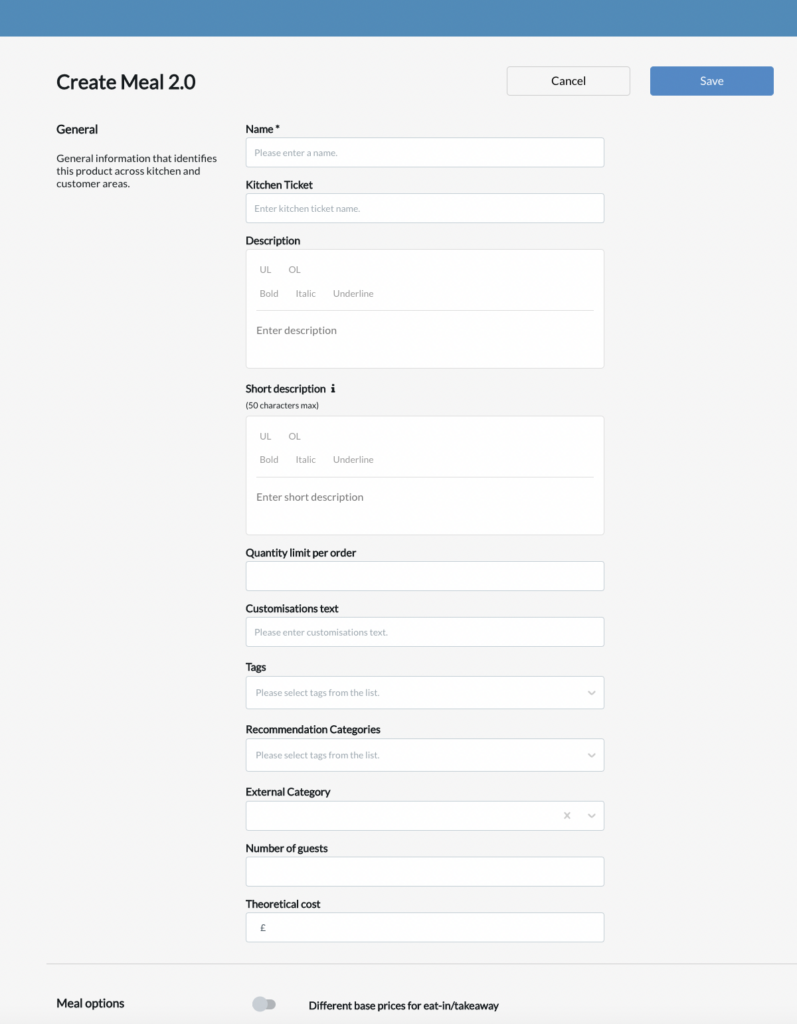
You will now see the Create Meal 2.0 view.
Our meals section is highly flexible with many fields that can be completed. However, not everything is essential. We’ve highlighted all the areas of the meals page in the below table to summarise what each field does and when its required.
The critical fields to ensure are filled out are:
Menu Name
Kitchen Ticket
Size & Price
Item Categories (if applicable)
Nutrition (if applicable)
Upsell Categories Images
Step by Step guide to each section of meal page
The Meals section is highly flexible, allowing for extensive customisation. Below is a quick summary of each section and its key purpose:
General – Meal name, description, and key identifiers.
Meal Size & Base Price – Define meal sizes and pricing.
Meal Base – Nutrition, allergens, dietary info, calories, and ingredients.
Alcohol – Required only for meals containing alcohol on delivery platforms.
Meal Categories – Customisations and modifications (e.g., add-ons, extras).
Upsell Categories – Selecting products to upsell alongside meals.
Meal Deals – Offering upgrades to meal deals.
Images – Customer and staff-facing meal images.
Kitchen – Operational settings for kitchen workflow.
Now, let's dive into the step by step guide in more detail!
SECTION
FIELD
INFORMATION
REFERENCE IMAGE
General
Name
(mandatory)
The name of the product displayed to the customer
General
Kitchen Ticket
The name of the meal displayed to staff on the kitchen display screen ticket and printed ticket.
This can be left blank if its the same as the “Name”
General
Description
(recommended)
Description of the meal displayed to the customer. You can utilise the formatting options to highlight key information to customers.
General
Short Description
This is a intended for a a short, punchy, description for the meal. Displayed to the customer before they click into the meal itself. Used to add
A setting needs to be applied by Vita Mojo, so please contact the support team to have this enabled
General
Quantity limit per order
If there is a limit to how many one customer can purchase in one order. Useful for catering menus!
General
Quantity limit per order
If there is a limit to how many one customer can purchase in one order. Useful for catering menus!
General
Customisations text
This is the text a customer will see if the meal can be customised e.g. Extras in a burger
Left blank it defaults to ‘Customisations’ at the top of the meal. Add text if you wish to change it or speak to Vita Mojo support team to adjust default text for all meals
General
Tags
(mandatory)
Essential for categorising your menu products and organising your menu! They help when needing to filter products in menu management, stock management and reporting
We are unable to delete products and items, however, if you use the tag “Archive” then this will automatically hide these products as this tag will always be selected in the Exclude Tags field.
General
Recommendation Categories
(recommended)
To ensure the effectiveness of your basket recommendations, we recommend categorising all your meals with tags. If there’s anything in the basket with the same recommendation tag as a product selected for basket recommendations, that product won’t be recommended. This ensures that a more relevant product, which the customer doesn’t already have, is shown instead.
Click here for more information on basket recommendations
General
External Category
Category tags are used to classify menu products specifically for your business, separate from customer-facing menu categories. These tags help organise your data and are available in Analytics Live Boards for reporting and insights
Analytics by default reports on menu layout categories. So this should only be used if you wish to breakdown menu product sales reporting further.
General
Number of guests
Useful if you want to report on number of covers the meal serves.
General
Theoretical cost
Cost of goods for reporting purposes
SECTION
FIELD
INFORMATION
REFERENCE IMAGE
Meal Options
Different base prices for eat-in/takeaway
Toggle ON if you have different pricing for eat in vs takeaway for the same sales channel e.g. POS or Kiosk
This is different to sales channels e.g. kiosk, click & collect. You can use pricing zones if prices by channel vary. Click here for more information on pricing zones
Meal Options
Straight to Basket
(recommended)
Toggle ON to allow a meal to be added straight to the basket without displaying additional information.
Highly recommended for non-customisable products, such as drinks, to create a seamless and frictionless ordering experience for customers.
Meal Options
Show price as “from”
Toggle ON if you want to show ‘From £…’ on the category page before a customer clicks into the meal. Useful for products with customisations or different sizes.
Meal Options
Show full price on sizes
Toggle ON to show full price of each size option rather than the price difference
Meal Options
Show full calories
Displays full calorie amount entered in Meal Base section.
Click here for more information about calories and nutrition.
Meal Options
Tax-exempt
Important to check!
Toggle ON if no tax is to be paid to the meal (applied to takeaway only)
Meal Options
Exclude from service charge
Toggle ON to exclude applying service charge from this meals cost
Only applicable if you have the service charge feature enabled
Meal Options
Base item takeaway tax override
Important to check!
Only applicable if you need to override the default value set up for your account for takeaway only. To override, insert the tax percentage value.
If left blank, the VAT rate applied will be the default rate set up on your account.
The default value is typically in line with your country regulations. If you unsure, please contact the support team.
Meal Options
Base item eat-in tax override
Important to check!
Only applicable if you need to override the default value set up for your account for eat in only. To override, insert the tax percentage value.
If left blank, the VAT rate applied will be the default rate set up on your account.
The default value is typically in line with your country regulations. If you unsure, please contact the support team.
SECTION
FIELD
INFORMATION
REFERENCE IMAGE
Meal Size and Base Price
Meal has multiple sizes
(recommended – if applicable)
Toggle ON if your meal has multiple sizes and enter the applicable size names visible to staff and customers. For example Small, Medium, Large
This feature allows you to manage multiple sizes in one meal rather than needing to create different versions
Select “Is Default” if you would like this size to be pre-selected when the customer clicks into the meal
Meal Size and Base Price
Base price
(mandatory)
Insert the price of the meal charged to the customer, inclusive of VAT.
Ensure to add for all sizes (if applicable) and eat in vs takeaway (if applicable) – see meal options section for the relevant Toggle.
The price is inclusive of VAT. Refer to the VAT fields to understand more about VAT
Meal Base
Allows you to enable nutrition, allergens, dietaries and ingredients
Meal has base
(recommended – if applicable)
Toggle ON to input nutritional information, including:
Calories
Allergens
Dietaries
Ingredients
Click here for more information about how to use this section to ensure accurate information is displayed to the customer
Meal Categories
Meal has base
(recommended – if applicable)
Toggle ON to input nutritional information, including:
Calories
Allergens
Dietaries
Ingredients
Click here for more information about how to use this section to ensure accurate information is displayed to the customer
Upsell Categories
Add upsell categories
(recommended)
This feature allows you to upsell other meals that are already on your menu. For example, you can display a selection of pastries as an upsell option when a customer orders a coffee.
Important: Before adding upsells, make sure you have created your upsell categories. Click here for more information on how to build an upsell category.
Upsell Categories
Manage upsell categories
Allows you to update the order of how multiple upsell categories are displayed to the customer.
Simply drag and drop to reorder.
Upsell to Meal Deal
Upsell to meal deal
(recommended)
Toggle ON if you want to offer a meal deal upsell within a meal. For example, a customer ordering a coffee can see the option to buy it alone or upgrade to a meal deal that includes coffee plus other products. Click here to find out more about each field to complete.
Important: Before adding upsell options for meal deals, ensure you have created your meal deal. Click here for more information on how to build a meal deal.
Online Ordering Image
(mandatory)
Click upload image to add the meal image that will be displayed on all customer facing menus.
Image specifications are provided in the section within the meal. Further information can also be found here
Till Image
optional
Click upload image to add the meal image that will be displayed on all staff point of sale menus.
Image specifications are provided in the section within the meal. Further information can also be found here
Kitchen
Kitchen Station
Select the relevant kitchen station if you wish to send meals to different areas of your kitchen.
Important: Before adding the kitchen station, ensure you have created your kitchen stations options. Click here for more information on how to create kitchen stations
Kitchen
Straight to pick up
Toggle ON if you want the meal to bypass the kitchen and move straight to a “ready to collect” status. Useful for anything which a customer may grab themselves or is by the pick up station for staff
Important: This is customisable by channel
Kitchen
Is printable
ON by default as most restaurants will want the meal to be printable on printed tickets.
Toggle OFF if you don’t wish for this meal to print on any tickets.